Monday 31 October 2022

A Breath Of Fresh Air

 On my "pre-tour" tour of Devon a couple of months back, I found myself driving in driving rain. This was "an unpleasant thing".

The car has a roof & side windows (optimistically referred to as "full weather gear"), but there are problems. The weather is mostly kept on the outside where it belongs, but some wet creeps in & the windscreen steams up. The car has a demister blowing warm air over the screen & this works to clear it, but also heats up the inside of the car. The side screens open a little, but it's still quite sauna like unless you're going quite fast or it's proper winter.

A potential solution is to remove the side screen - I found I could do this from the driver's seat without too much difficulty, but the operation is fraught with the risk of dropping the retaining pin or the screen (or both), then if it's a downpour, the rain makes it's presence felt.

More options were required, so I ordered a pair of "cockpit vents" from the marvelous Car Builder Solutions people. When they are described as cockpit vents, they mean just that as these are an aircraft part used mostly on Cessnas & the like, but their use has also migrated to hard-core race cars. They pop into a 3 1/4" hole & can be closed, open facing forwards to force air in, or rotated aft to draw air out.

So I needed a couple of 3 1/4" holes cut then.

I asked my Brother if he had a fly cutter, but his pillar drill doesn't go slow enough for one, he did however have a suggestion. We could mount his router upside down under a board & rotate the screen about a pin to cut the hole. This sounded like a plan & had the side screens been made of Polycarbonate (or indeed plywood) it probably would've worked really well.

We set it up in his garage & I started cutting a piece of 5mm ply as a test run & it worked very well indeed, the ply broke right at the end leaving a bit of a chunk, but it had failed due to cutting through one direction in the grain. Plastic wouldn't do that obviously.

It didn't. It just melted and then it got wrapped round the cutter & heated up the rest of the screen.

I did get a hole, it was 3 1/4" across or thereabouts. What it wasn't was round.

 We had another try. this time my nephew played air from the compressor onto the cutter to cool the area & I turned the screen the other way so the majority of the cutting & therefore the heat happened on the inner edge which was scrap anyway.

So was it an improvement? Yes & no. The cut was better, much more circular & the screen I would be keeping hadn't melted, BUT the cut plastic still melted & collected behind the cutter - where it welded the inner & outer rings back together!

I managed to saw through the "weld pool" once it had cooled & when I got home I broke most of the rest away with pliers & finishing VERY carefully with a sanding drum in a dremel.

The result was pretty pleasing considering how it had looked an hour or so before - that is the good - the less good one ison the passenger side, so I don't need to see it. 
Saturday 22 October 2022

It LIVES (again)

Today I've put the dashboard back in with a little wire tidying, then turned my attention to the fuel system. I've already removed the swirl pot, the low pressure pump, three of the fuel filters (it had five when I bought it) & changed the wiring round so the feed to the high pressure pump goes to the back of the car. Today I sorted out the plumbing (mostly) & the wiring to the pump. I say "mostly" because I've ordered another fuel filter  - thinner & 100g lighter than the billet alloy "motorsport" filter on the car. This wasn't a weight saving plan, it was space saving, the existing pre-pump filter could only fit above the pump (making priming it difficult) or in front of the tank (making it very close to the moving axle). The one I've ordered will go in front of the tank with no danger of being knocked off.


Then I put some fuel in & with the system cobbled together, started the engine so I know the new slimmed down system works. It's simpler, draws less power, has less potential leaks & the car's a few kilos lighter.


I'll be tidying that plumbing up once the chassis is cleaned & painted.


And that Panhard rod's getting powder-coated black as well!

Monday 17 October 2022

Creaking - Gone!

Over the weekend I put a coat of satin black on the front hubs & took the dash out to see if I coule re-route the wiring for the high pressure fuel pump from the engine bay to the back of the car where the pump now lives. I could! And it was much much easier than I was expecting, so that's another two yards of wiring gone.

Today the grease seals arrived for the front hubs, so I took the freshly cleaned & painted hubs, fitted the bearings & seals, re-fitted the discs assembled them onto the spindles with the brake calipers adjusted it all up & marveled at how smooth & quiet the bearings were. Then I put the wheels on & dropped the car back onto it's suspension.

The thing I imediatley noticed was how easily the car now moves on it's suspension. I can bounce it up & down by pushing on the inboard end of the rocker arms like I could with the Fury & no creaking!

There must have been SO much sticktion in the old hard plastic bushes. So the front's done apart from tightening a few bolts & I can now lift the back & finish the fuel system. Hurrah!

Monday 10 October 2022

Rumblings

 I knew the off side front wheel bearing was on its way out, there was a little play & slight rumbling when I span that wheel before the road trip, but saying "It'll be fine" I adjusted it up & drove off into the Welsh hills.

And indeed it was fine, I checked the wheel regularly & although the play had come back, it got no worse. I've just looked at it with the intention of fitting alloy hubs (but they only make them for RS struts - why?) & yes the rumbly off side one is probably nearing the end of it's useful life.

New ones on order from Burtons.


Saturday 8 October 2022

Forgot......


A day or two ago I took off both front lower wishbones & replaced the hard & squeaky bushes with the softer ones I'd bought for the rear suspension - they were the same size which was a stroke of luck, so I'm hoping the squeaks & creaks will have gone & the car will be quiet(ish) & smooth.

Simplicate & Add Lightness


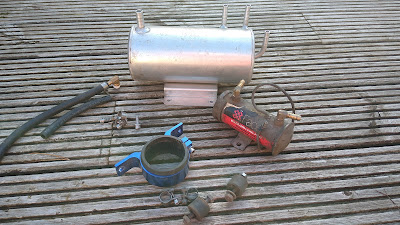
It's an old adage, I've seen it attributed to many people - but today it was me who said it. I've mentioned the car's original fuel tank before, it was clearly designed for fuel injection with a "sump" in the bottom face, but as it's a live axle car, there was nowhere to mount a high pressure pump at or below the tank lower face. So the builder fitted a low pressure lift pump & a swirl pot. I'd already reconfigured this system to remove a couple of fuel filters (it had five) & move one to protect the injectors, but when I designed the tank, I had a bracket welded on to accept a high pressure pump.

Today I reconfigured the system again to the layout I want. The low pressure lift pump & swirl pot have gone along with four lengths of hose & eight hose clips, so there are less leak paths, there will be fewer electrical runs & the car is about 3 kg lighter.

I've done a few other little jobs today, just a couple of things that needed looking at as the car's done 7,200 miles since February with very little maintenance.

I'd notice a couple of times on the road trip a shriek from the alternator belt when the engine fired & sure enough the belt was a little loose - I shortened the adjuster & it's pulled it tight again & I've looked into moving the screenwash bottle to where the swirl pot used to be to make it easier to fill, but that's a job for another day.

I've ordered the poly bushes for the rear suspension & also a set for the front shocks, as all they had was a rubber sleeve & would "migrate" to one end & scrape on the rockers. Headed bushes will fix that. So, busy day & things in the post for the next jobs. Excellent.

Spare bits


Monday 3 October 2022

Back To The Engineering

 The Stylus is now on SORN for winter mods.

Nasty Things
The first thing to get my attention was to tidy up the last of the handbrake cable issues & see how it felt before re-engineering anything.

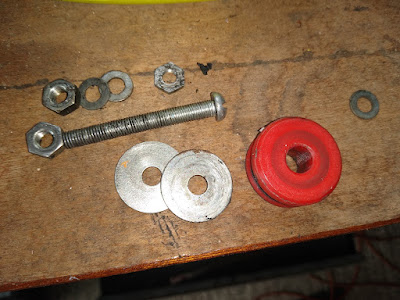
I'd already replaced a way-too-short balance bar with an aircraft flying control pulley so both brakes balanced properly, then just before the last road trip, I'd replaced a soft plastic pulley below the handbrake lever with another flying control pulley. But when I took the old pulley & it's nasty screw & assorted washers & cheap nuts off the car there was a large (15mm) hole in the trans tunnel, a 15mm ID tube on the inside & some kind of bung in the middle with a 6mm hole in.

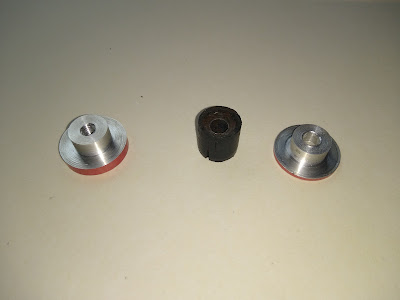
New top hat bushes & the nasty bung.

Clearly the offset between the bung & the inner panel where the pulley was would mean the pivot bolt would bend when the brake was pulled, on top of that the bung turned out to be a steel bush in a plastic pipe, so even more movement was happening.


I went to my Brother's & turned up two "top hat" bushes in alloy, one with a 6mm hole was a snug fit in the large hole in the panel, the other had an M6 thread & would fit in the tube on the inside.


But crucially, because the pivot bolt was now properly supported, all the force from the handbrake lever would now go into pulling on the cable, not get lost in deforming the plastic pulley or bending the nasty screw.

Top hat bush fitted

Fitting it was a bit of a faff, but not as bad as it was before when I had to lay on the floor with one arm in the car turning the bolt & the other under the car holding a spanned in the transmission tunnel.


Once tightened up I pulled the brake lever & it now feels like it tensions the cable, then pulls the brake on & with six clicks on the ratchet I can't push the car along any more. No idea if it's now good enough, I need a rolling test for that & as I said - the car's now on SORN.


But I now know the mechanism is as good as it can get, so if it needs more I can drill the handbrake lever to increase the leverage, safe in the knowledge that all the power is going to the brakes. I may need to get a long button head bolt to swap for the cap head, but that's trivia.