Friday, 15 January 2016

Sockets Finished

Home from work early & straight out to the garage. I made up a small wiring loom for the back of the new socket panel, tested it, & fitted it. It's not an easy thing to photograph, but that's a good thing - it's not supposed to stand out, it's supposed to do it's job well, but quietly.
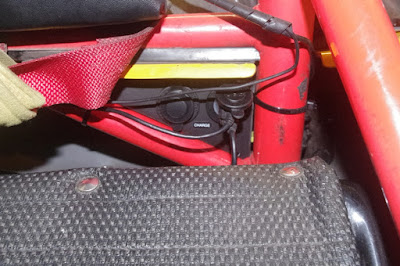
Here's how it looks - bearing in mind that the flash has lit the matt surface, you cant see it that easily in real life. The two USB sockets will run the GoPro cameras, the new 12v socket will run a "battery eliminator" on a two-way radio ready for the "Rogue Runners" tour of the UK later this year. The plan is that the radio will spring into life when the ignition is switched on.

I've also been looking at the antenna for the radio, I've separated it from the radio with a lead, but how to mount the antenna when I'll need to put the soft top on from time to time? I think the solution is pretty cunning, I've glued a bracket onto the side of the forward looking GoPro which sits above the roll bar, so when I fold down the camera, the antenna goes with it. Genius.

Wednesday, 13 January 2016

Rear Power Sockets

I'm still tiddivating ready for spring.

My focus at the moment is the rear power sockets, up 'til now I've had a clamped on cigarette lighter socket ty-raped to the diagonal of the roll hoop with a USB adaptor pushed into it. It works, but it's a bit ..... temporary.

With the arrival of the new two way radio I needed (ok, needed is a bit too strong) another 12v socket in addition to the two USBs for the GoPros - I HATE having wires trailing round the car.

So, searching eBay I found a pair of sockets, one twin USB, the other 12v, made to marine standards & mounted to a plinth for a good price & this evening I've disposed of the plinth & made up a bracket to fix the sockets in more or less the same place - the small triangle formed by the roll bar upright, horizontal & diagonal. I've made it from black anodised aluminium alloy & I now need to wire it up & fit it in the car.

I've also ordered a speedo calibrator from America, I had asked a friend who's good at electronics to invent me one, but my timing was lousy, since I asked,  he's moved house & become a father, so his time is at something of a premium. Anyway, it should be here just after the weekend, so I can fix another long-standing niggle.

Thursday, 7 January 2016

A Little More Action

I'm laid up with manful at the moment, so time to update the blog.

I've realised I've not shown a photo of the 3d printed cap fitted, so here it is:-


In other news I got a two way radio for Christmas, several of the club have them for chatting on the move, so I've been considering the best way of fitting it in the car. I've got a "battery eliminator" (a battery case that plugs into a lighter socket) & an earpiece with Press-To-Talk button, so with a little re-configuring, the radio will mount to the car on a quick release mount, come on with ignition & be hands-free. Unfortunately, all the other bits I need to fit it are still in the post, so I'm a bit stuck.

On a more positive note, I'm signed up for three tours this year, so looking forward to those now the car's running a little better.

Thursday, 31 December 2015

Dash Refreshed

Well, I re-assembled the dash & fitted the new oil pressure gauge - of course it's not quite the same as the other gauges, but hey ho.

I fitted the new oil pressure sender & connected it up, started the engine & ........ odd, the oil light stayed on, but the gauge went off the upper end of the scale. Hmm, check earth, OK, take the dash back out of the car, check all the wiring, all OK, check the earths again, still OK. What was odd was that the oil warning light was on (no oil pressure) but the gauge was reading off the scale (lots of oil pressure).

Then (after a day or two) I realised I'd connected the light to the pressure sender & the sender wire to the low pressure switch. swap them over & it all works.

So now the dash looks like this:-
Out of sight on the right is a black anodised panel with the rear fog & screen heater switches, so it's all pretty neat (well, I think so).

Sunday, 27 December 2015

Christmas Break

So what Have I been doing over the Christmas break then? Well I've hat the dash out & painted the rims of all the gauges & warning lights in aluminium, I've also made a new switch panel for the rear fog & screen heater switches & warning lights, as a bit of a dash refresh.

While the dash was out I replaced the bulbs in the gauges with LEDs & painted the bulb in the main beam with silver paint as it was too bright - the only thing I could see on main beam was the dazzle from the main beam warning light.

I also fitted the new oil pressure sender & wired up the gauge (Christmas presie) & started the engine. I’d always been worried about the oil pressure, the old gauge showed 1 – 3 bar & often flickered towards nothing-at-all, but the new gauge is showing a healthy 6 bar (90psi) at idle so all seems well.

So with that all installed I can re-fit the side pod & the dash itself - hoorah!

Sunday, 13 December 2015

Cap Complete

With a couple of minutes to spare this morning, I finished off the 3d printed dummy oil filler cap with some silver paint & some lacquer
 <¬ Here we are, for something knocked up for free, I don't think it looks half bad, certainly more '50s than the one it covers up. I still need to glue it on.


This picture shows it with the ally cam cover & the retro stickerage.


Monday, 7 December 2015

The Cap Fits

Did I mention the plan for a 3d printed oil filler cap cover? Did I? Did I?

It came out of the printer today, here it is, seen from the bottom, with the real cap for comparison.


And here's how they fit together.


I've started the paint to make it look more proper, first is filling the "engraved" text with red, then the circle will be painted black, then that'll be masked & the rest of it will be sprayed silver & lacquered


So at the moment it looks like this.