Saturday, 28 May 2016

Looks A Bit Rude


Doesn't look at all like something from
Ann Summers' electrical dep't 
There was some kerfuffle going on at the stables, which meant Mrs Blatter was out, which meant I could get into the garage unobserved.
 
Today the Postman bought a small piece of aluminium tube I’d bought to create a handbrake handle. Up to now I’d used the standard Sierra handbrake with all the plastic handle stripped off, it looked rather too basic & there was a slot under my finger when I pulled the brake on.
Still haven't worked out how to turn pictures round

I didn’t want an “aftermarket” one as they generally have “GT TURBO” or somesuch written all over them, so I carefully measured the lever & bought a tube with an I/D just bigger – no, the I/D was just smaller, The seller did say it was 3/4" - 19mm, but not exactly which - so it wouldn’t fit.
Not to be thwarted, I dremelled the inside until I could hammer a socket in to both stretch & score the I/D a little larger & after a couple of hours faffing about I was able to tap the new handle into place.
Good isn't it?

Friday, 27 May 2016

Hose


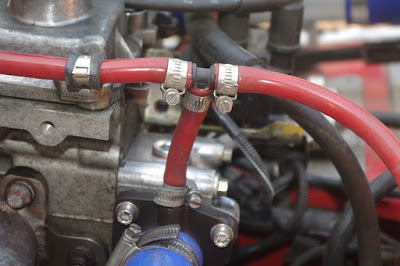
What began as me wandering out to the garage looking for something to do turned into a couple of small but quite significant changes. Firstly I cut two holes in the cam wheel cover & painted the rather-too-nice-to-hide five spoke cam wheels red, then I noticed some red silicone hose left over from a job I'd done on Mrs Blatter's car ("The Pimp-Mobile") & re-plumbed the radiator vent hose, from the rad, up along the cam cover through aircraft P-clips, to meet with the vent hose from the thermostat housing & then to the expansion tank & another piece to replace the tank vent hose.
Ideally the hose should be blue, but when ordering it for Mrs Blatter's car, blue was out of stock. The run along the cam cover is higher than the old one along the chassis which means the rad will auto-vent where previously I had to pull the hose off to get the air out. Another small-but-significant job was to put the passenger footwell carpet back in. Astute readers will note that I put this in last week, but when setting off for work in the Fury or Tuesday I found the carpet on the floor - normally a good place for carpet, but not on this ocasion.
So the Velcro was all torn off & I used high temp contact adhesive (yes that smelly stuff) instead & it seems to have worked - Hurrah! Having taken the car 60 miles on a return trip to my Dads, I can say that it seems noticeably quieter over bumps & the passenger footwell seems a lot cooler (as tester by a non-calibrated hand). Hopefully Mrs Blatter will remain uncooked on the trip to Cheltenham next month.

Thursday, 19 May 2016

Red Gaiter

A few days ago I fitted a cold air blown heat shield & the chassis side panel was noticeably cooler, but there's still work to do, this evening I've replaced the "witch's hat"  (gearstick gaiter) with a new red one I got from Stoneliegh.
 

Wednesday, 11 May 2016

Wife Cooler 2

I've had a bit of a change of plan - no, I'm not leaving my wife at home - I've decided to shroud the radiator & add an intake duct to collect air for the exhaust bay spray bar. Naturally the shrouding will be black & the intake trumpet will be anodised red. This plan means I can add another intake at the back supplying air to the back of the spray pipe if the front one doesn't supply enough "woof" & I also have a planette for adding a vent direct into the footwell with a cable operated diverter - this may be getting overly complex though.

I'm thinking of taking Friday off to intall & test all this.

Friday, 6 May 2016

Wife Cooler

On the Rallye Des Jonquilles, Mrs Blatter had mentioned that the passenger side got very warm - fine for April, but likely to be uncomfortable on the WAGS Weekend in June (when it'll be much MUCH warmer won't it?). It's warm on that side because the exhaust runs through the side pod, & although it's vented & lined with heat mat, the warmth still gets through.

So today I spent a long time looking into ways of cooling the passenger footwell & have settled on a two-pronged approach.

Prong 1 is to drill a line of holes at the front of the footwell, with a ramp ahead of them to create a low pressure area, this should draw air out, improve the flow & prevent heat building up.

Prong 2 is to fit a scoop (CAD designed & 3D printed) ahead of the nearside rear wheel connected to a duct taking cooling air to the cockpit side wall, as shown in the pic (scoop is dark grey, duct is silver, side pod it not shown).
 
The idea is that high pressure air under the car will be forced into the scoop, up the duct & spray out along the cockpit side panel, thus cooling it - or at least stirring up the warm air a bit.


I also found the new thermostat housing was dripping, so took the cover off & fitted another O-ring around the thermostat. That seems to have done the trick.
 
AND – I stuck the “WAGS Weekend” sticker on, though I’m getting seriously short of space for trip stickers.