Friday 31 December 2021

Festive Period

There’s been a lot of garage action over the festive period, but not a lot worth photographing I’m afraid, here’s a sort of list:-

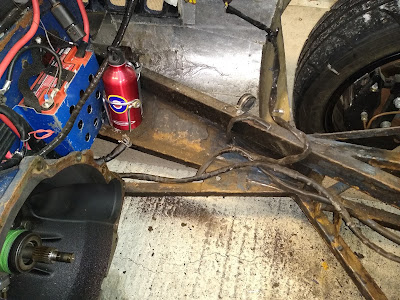
Chassis – all the cleaning, de-greasing & painting is done (bulkhead forward).

Fuel System – cleaned, re-configured, shelf re-engineered & re-installed.

Front Suspension – cleaned, de-greased, painted & re-installed. I have a query in with the shock manufacturers as there’s no lock rings on the lower spring pans which doesn’t seem right.

Brakes – Cleaned ready for reinstallation, but with the smaller discs & the spacers under the callipers removed the pads overhang the discs by about 5mm so I need to get the mounting brackets machined, I have a plan for this!

Brake lines – Re-installed, now with bolted P-clips, not riveted. Flexi lines replaced.

Electrical looms – Re-installed, now with bolted P-clips, not riveted. Battery & cage re-fitted.


Brake reservoirs – The three reservoir pots (front brakes, rear brakes & clutch) & their bracket have gone, there will be a combined brake reservoir - crucially with a low level warning - & a separate clutch reservoir. I’ve drawn up the new bracket & a sheet of 1.5mm aluminium sheet is on its’ way. The final design may get "rationalised" (not be that posh).

Fuel lines – The two original ones remaining on the car are cracking & need to be replaced.


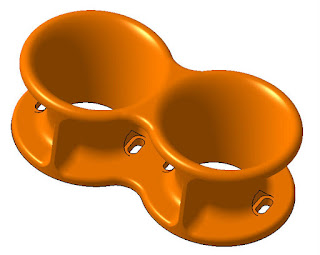
Throttle Bodies – The vacuum lines weren’t great so there’s new silicone hoses in the post. Also the trumpets / ram pipes / velocity stacks were parallel for most of their length with a flare at the end – which was just inside the air filter inner surface. I want to replace the air filter with an airbox & remote filter / intake, but for now I’ve drawn up shorter trumpets with a nice parabolic entry & the first pair is on the 3D printer as I type.

So the car is very much being re-built ready for the engine to go in when the aluminium bell housing arrives, hopefully mid January, there’s some fiddly bits like the brake calliper brackets & reservoir mount, but mostly it’s just putting stuff back & making sure it works.
Monday 20 December 2021

And - Breeeeeath

Half of the chassis refurb is kind of finished!

After what seemed like a week of scrapeing & cleaning - but was probably seven days, all the rust & paint was finally stripped & after de-grease & metal prep, a couple of coats of grey have been splashed across it. It doesn't look brilliant, but it was never going to, being a 20 year old chassis & looking good was never the point.

While that was drying I took a trip to Think Automotive & purchased a few fittings to get the fuel system sorted. It looks similar, but the tray has been lightened & stiffened, the hose & wiring runs are simpler, the filters are in the right places & it’s been de-blued.

I've added a fastner into the pedal box at the top because the whole tray was more or less attached in a single plane & although a stiffener had been rivetted on to support the swirl pot, it had been placed vertically so wasn't doing much, I've lowered the swirl pot & placed the stiffener horizontally & the swirl pot no longer sways about.

I just need to get the off side cleaned stripped & painted & I can start re-building! HURRAH!!

Saturday 18 December 2021

Scope Creep...

 ... Yeah, there's a bit of that going on.

Having decided to change the engine because I ran it air cooled for two hours (it still started & ran) it seemed sensible to bring forward the chassis refurb I'd planned for next winter, but then the front suspension would ideally need to come off for access, so why not clean & paint that at the same time?

Actually, if the front suspension's off, why not modify the brakes to allow the 13" wheels I'd like? Although as there's now air in the brake lines, I may as well swap from the three reservoir set up (front & rear brakes & clutch) to a combined reservoir for the brakes that allows a low-level switch - reduced weight, added safety - win/win.

But while I'm messing with the hydraulics I could take out the piece of rigid pipe from the belhousing to the clutch slave cylinder - it does nothing & is just more weight & potential leak paths.

OK the front of the car's looking pretty bare now, but there's a shelf under the off side wing with a fuel swirl pot, a pump & two filters on - it's in the way of chassis cleaning & really - I'd like to rationalise it a bit, but with all the components out of the way, I find it's held in by bolts - I'd assumed it was originally a welded in battery tray. So now I can take that  out & strengthen it as the swirl pot's always moved about.

The upshot of all this over-thinking is that there is now nothing else to remove forward of the front bulkhead & I have a LOAD of work to do. The near side front suspension is all cleaned & painted, I have new brake lines for the front too & I've established that I can use the calipers on the car with Capri 2.8 front discs to allow 13" wheels. The near side of the chassis is all stripped of paint, powder coat & in some places underseal, de-greased & ready for prep & paint with POR15. When that's done I'll re-fit the near side suspension & start on the off side, as well as cleaning & de-greasing the rest of the chassis. After that, I have to make something sensible of the fuel system parts & make a new hydraulic reservoir support bracket, Re-fit the brake lines, drop the new engine in & get it rolling-roaded.

It'll be like a new car - IT DAMN WELL SHOULD BE!! The only things I won't have touched will be the rear suspension, axle & brakes & they are all more or less new.

Wednesday 15 December 2021

Front Suspension


I've not been out to the garage for a day or two, I've been sorting some paperwork & dealing with the everyday stuff that gets in the way of hobbies. Today I put up new curtains in the Front room & in the Dining room, I took down a thin curtain pole that had a "string curtain" fly screen, put up a new curtain pole for - curtains, then re-bent the brackets for the thin pole & attached them to the brackets for the new curtain pole, so I have curtains for the first time, but inside them I still have the fly screen for the summer - I am that cunning.

But you haven't come here to read about my DIY.

With the engine bay stripped of just about everything, my attention has turned to de-rusting & paint, first thing in the barrel was the near side lower wishbone, it came off the car easily enough & I set to with a rotary wire brush & eventually all - or at least enough - of the blue paint was off it, then a wash with POR15 de-greaser, a dry off in the oven......... 
........ & it got etch primed & a coat of satin black. The rose joint & bushes seem fine, so it'll go back on once the paint on the chassis is finished.


The upright is stripped & cleaned ready for de-grease & paint, the brake calipers are off the car & cleaned ready to go back on with new hoses, but I need to visit Margnor to get a set of shorter bolts as they'll be going back on with Capri 2.8i discs, so won't need the spacers.


Last on the list for today was the near side rocker, I was very pleased to find it has the roller bearing set already fitted, so it's just got dismantled, cleaned, the paint removed & it'll get painted next time I'm in the garage.

Thursday 9 December 2021

Tin Bashing


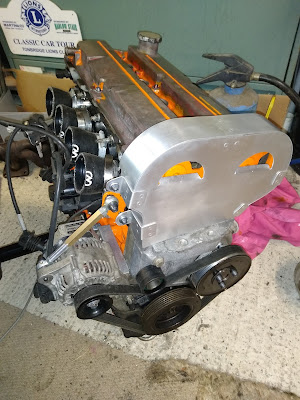
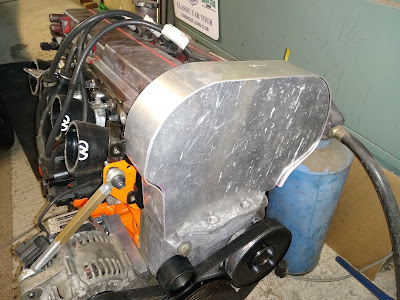
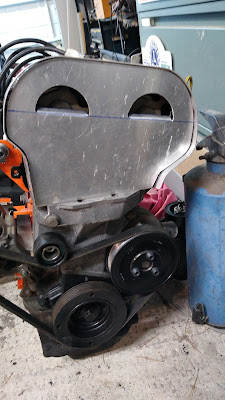
OK, yesterday I said the cam belt cover was another ½ day’s work & today I’ve been on it pretty much all day BUT it is about finished & I’m quite pleased with it. I’m sure it would make my younger aircraft-fitter self weep & the riveting wouldn’t pass muster, but in my defence I didn’t really have any proper tooling, so it’s not bad. I was quite pleased with the Zed brackets that both hold the cover onto the engine and hold the front panel onto the side / top / other side.

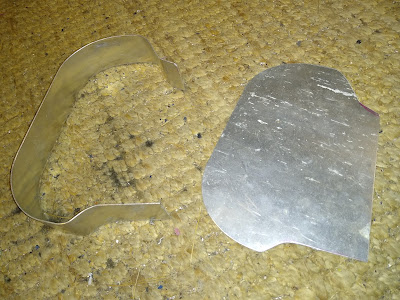
Here you see it before final assembly held together with jig pins.  


The other thing is, it’s supposed to look old (it will look older when the brushed finish dulls down a bit) so when I found some aluminium sheet the right size with a few dents & scores in it I thought “that’ll do”, but now of course it looks like I dented it while making it – not so good.

I’ve also put a coat of orange on the cam wheels so they show up in the holes & painted over the remains of the red on the cam box with orange – not sure about that yet, I’ll see how it looks tomorrow.

There is also a question mark over whether it'll fit under the bonnet - it should do, but I'll cross that bridge when I come to it,


Wednesday 8 December 2021

Didn't Mention....

 A blatt in the Quantum last weekend. No supercars this time which is a blessing & the Q was very nearly faultless. The starter's still not right, but a new one will fix it when I have some money & for now I know the problem is heat & it's only going to get colder. But yes, it kept up wit the Elises, then took me to my Dad's, a friend's, my brother's & then home. 220 miles at 43mpg.

Pretty good for a 20 year old kit car.

Happy Engine

 In theory today’s job should’ve been more chassis cleaning, but as we discovered yesterday, I’m easily distracted from such things & indeed that was the case today.

First there was finishing stripping the engine mounts & putting them through the parts washer, then I took the silver top off the Silvertop (the cam cover) & swapped it for the black top from the Blacktop. Having started on the engine I carried on, fitting the coil pack mounting (one of the holes I’d used is the ONLY one that’s in a different place between the engines). I also swapped the oil pressure senders over which require removing the new alternator mount to trim a corner off – which was a good thing because I noticed it didn’t quite sit down flat, so I put a couple of washers under it to fix that & drilled & wire-locked the bolts for good measure.


At odd times during all this activity I put some primer & then satin black on the engine mounts so they are now FINISHED. Though I realised the holes in the block I need to use to fit the mounts have never been used, so I had to slot a bolt & use it to clean out the threads.


Then I stood back & looked at the engine & the cam belt cover stood out as being the only bit of plastic left on the engine, so I started making an alloy one using a slightly improved design to the one I made for the Fury.


So where do I stand?

The engine is all but done, just waiting on the clutch plate, the sump gasket (both in the post), the cam belt cover needs ½ a day to finish it, then the Silvertop can go into long term storage, the Blacktop can go into a corner & I can raise the car on stands to carry on with the chassis & begin the suspension.


And there it is - the happy engine >>


Tuesday 7 December 2021

Cleaning

 Today the nasty jobs started. To begin with I tried to put it off by dismantling & cleaning the engine mountings, but they wouldn’t dismantle. I could see the nut holding the rubber mount on inside the steel tube, but it wouldn’t undo. I couldn’t even get a socket on the nut properly. There was a fair bit of rust & crud in there, so I tipped in some WD40 & left it for later.

That left me with only one choice, I’d have to start cleaning the chassis – unless – really I should take out the exhaust manifold because that would just be in the way. The bolt head on the Mikalor clamp was mangled, so I cut through it, unscrewed the Lambda & it came out pretty easily. So now I really ought to clean the chassis – but the battery tray should come off - & then as it was covered in flaky blue paint (everything in the engine bay is covered in flaky blue paint), I took it off the car & wire-brushed it back to the alloy, then sort of polished the wire brush marks out.

So, back to the chassis – although – the WD40 on the engine mounts should’ve worked by now. It hadn’t, I tried a number of different size sockets & none would engage with the hex, there seemed to be a lump of stuff at the bottom of the tube stopping the socket going over the nut. I tried chiseling at it with an old screwdriver, but eventually got bored & went back to the chassis cleaning – which wasn’t actually too bad. There’s no pitting & although the inevitable blue paint & black powdercoat underneath have cracked & allowed water in, it’s just a little surface rust, so I’ve cleaned a fair bit of the near side & when the engine is ready to go in......

- so I can move the old engine into storage

- so I can decide where in the garage to put the car up as high as I can get it on stands

- so I can take off the front suspension & steering for access

– then it won’t be too bad a job to clean off the rest & get the surface prep & paint on.

When I’d finished, I looked again at the engine mounts & realised the lump of stuff stopping me getting a socket on the nut was weld – all I had to do was unscrew the rubber mount from the steel tube (sigh). I did clean them all up & cut off an old throttle cable fitting made from a piece of steel 1” x 1” x 2” – a solid block of steel welded on to the off side engine mount. Another bit of weight saved.


Friday 3 December 2021

Here We Go Again


Today saw the beginning of the next project. The Silvertop Zetec that ran air-cooled for a couple of hours has come out of the Stylus & I've started transferring the worth having parts onto the Blacktop. First to move was the Raceline flywheel - must remember to put a bearing in the end of the crank! It had a paddle clutch which only has 1mm of pad left, so I think I'll put a conventional clutch back in.

There's no rush, while it's out I'll be cleaning the oil off the chassis, then the peeling powder coat & paint, treating the surface rust & re-treating with all the tools in the POR15 box, the cleaner, the metal prep (which I suspect is little more than salt water, though I'll not be tasting it to find out), then the POR15 paint, probably followed by Hammerite or somesuch. After that the chassis should be good until all the petrol runs out.

Still to get swapped are the Raceline sump & the die-cast cam cover, the coil pack mounting plate & one or two bits that will go on once it's installed. One thing NOT going on is the alternator mount. Partly because the alternator will be on the other side of the engine, partly because it's made from 10mm steel plate & weighs 3 1/4kg. It is HUGE, but I'm guessing from the way there's a plate that wraps round the front of the engine, that it used to mount something else when the car was supercharged.


In other news, the Quantum now has a flexi-pipe in the exhaust, I had to move the LAMBDA boss into the Y pipe under the engine - don't know why I didn't put it there in the first place - & it now drives very well indeed. I just need to sort out the starter motor & it's all done - kind of. There's "nice-to-haves" like the stereo still to fit, but I don't use it anyway, I'll only be fitting it to fill the hole in the dash. But it's a world away from when I bought the car & it wouldn't go into gear because the clutch pedal hit the floor before it disengaged, if you could get it to disengage the gear shift was so sloppy there was no telling what gear you'd get, there was next to no power & these were good things because if it did get going the steering was too stiff to steer with & the handbrake didn't work. As well as some more minor faults. It now keeps up with the Elises on a Sunday run, so I'm quite pleased.