Sunday 29 August 2021

Stoneleigh 2021


The Southern Kit Car Club put on a decent effort for the National Kit Car Show - much delayed & re-arranged which may explain the lack of an awful lot of suppliers. The two main shops I wanted to buy from were not there & the usual three halls had shrunk to one sparsely occupied hall. The club stands were better attended but numbers were still very much down on previous years. Some clubs like the Royale owners' club were here in numbers I'd never seen the like of, others like the Rickman owners may as well not have bothered, with two Rancher campers present.

Anyway, we had a nice drive up, had a look round, drank beer, ate burgers, talked bollocks & had a lousy night's sleep.


In garage news I had printed the upper steering column shroud & it fitted quite nicely, then immediately started the lower one going, I wondered if there would be enough filament to finish it, but in the event that wasn't the problem & it finally finished printing only ten minuted before I had to set off the following day!

I arrived at Newlands Corner with a few minutes to spare & chatted with the chaps, then we headed off. we were quite late leaving this year which meant the traffic was worse than usual, but when we did break free of 30 limits, viscious speed humps, festival traffic etc we found ourselves stuck behind cement lorries & combine harvesters. All very frustrating. but in the end we arrived & while driving round looking for our pitch I was waved onto the Quantum Owners Club stand (busy) & had to politely wave a refusal.


So I couldn't buy a lot of the things I thought would be easy, but I did get a piece of ribbed floor mat to replace the driver's side one which was plainly cut the wrong way up as the ribs aligned the wrong way, & a rear view mirror as there wasn't one.


On arrival home - the Quantum having performed pretty much faultlessly (except for a few ground scrapes & a minor exhaust leak at a joint) achieved around 45mpg, I cut the mat (correctly) & drilled the dash top for the mirror (hanging if from the screen surround in the normal way puts it in the way of seeing out), then made up a plate with two riv-nuts & glued & riveted it on, so I now have a nice shiny mirror. I then fitted the column shroud & I'm about ready to tax the car for some test miles.

Friday 27 August 2021

Almost Forgot

 This PM I cleaned & polished the Quantum as I'm going to the Kit Car show at Stoneleigh tomorrow & someone might want to buy it. So it's all shiny & white & the grubby fingerprints have gone.


Incidentally I filled it with petrol earlier on & my spreadsheet is telling me it did 50.4MPG which seems remarkably economical for what is now a reasonably quick car.

I'll see what it says after the Stoneleigh trip.


Even Almost Finisheder


Hooray & hoorah the primary clocks arrived as promised from ETB - unfortunately they billed my credit card one day too early for it to be held over to next month's bill, but what-ever.

They slotted straight in & connected to the existing wiring (which is one of the reasons I went for ETB clocks) & all I had to do was plug in the old speedo, get the calibration figure off it & put it in the new one, the tacho came pre-set & it all seems to work & the milometer starts at zero, so all the miles on it will be miles I've done.


Yesterday I set about drawing up a steering column shroud & printing it. This was a bit of a strain as it involved "surfacing" on the C.A.D. system, which is all a bit "airey fairy" & not very geometrical. I printed a first fit (in "prototype pink" - it said it was RED when I ordered it) which kind of fitted, then tweaked the design & printed it properly, then (as I generally do) I decided I could do it better & re-designed it & printed it again. The bottom half is on the printer as I type, but the top half fits so it should all be good. the pic below was "hot off the press" the front edge was the face on the build table, I've trimmed it all & cleaned it up now.


Monday 23 August 2021

Tidying Up

 One thing I did to the Fury that I liked out of all proportion to the effort involved was to move the coil pack down below the throttle bodies & run the HT leads up between the TBs, which kind of made it look more old school - as if there was a distributor down there.

On the Fury it was done purely to make the engine look older than it was, but the Stylus had a problem. For some reason it has been fitted with a water rail - it doesn't need one,there's plenty of room for the Ford thermostat housing but it's there, with the business end under a none-to-pretty home made coil pack bracket (1/2kg). this is a problem because I need to run a hose from the water rail to the heater & the coil pack bracket is in the way.

So, re-cycling is a good thing & the 5mm plate from the footwell that used to mount the ECU got cut down, re-shaped & now mounts the coil pack. On the Fury I had HT leads made to fit, but when I was struggling to get the Quantum to run nicely I'd bought an HT lead set, so using leads 3 & 4 from both sets I had what I needed. Also in the "good luck" column was the coil pack trigger wire being long enough to reach in its' new position. In fact I tidied all the legs of the engine bay loom while I was there, so they don't dangle quite so much.

But removing the coil pack bracket gave me another problem. I'd already moved the Fuel Pressure Regulator once because it was mounted at the top of a leggy bracket welded to the coil pack bracket & I'd cut off the leggy bit & re-mounted the FPR. the other day I searched around the back of the engine in vain to find somewhere to put it, but every place I tried something got in the way of the input, the output, the vacuum line or the gauge was facing downwards. I was looking again today to no avail, when I was "struck by the bleedin' obvious" - the fuel rail is just a pipe - it doesn't care which way the fuel flows though it, so after cutting the rigid pipes down a little to make the hose runs smoother, I made a bracket from another off cut of the ECU plate & mounted the FPR at the front & re-routed all the hoses to suit.

I tidied the tools away, checked all the hoses were connected & tight, turned the key, the Low Pressure pump filled the swirl pot, I switched on the High pressure pump & the fuel rail filled, I pushed the starter & it fired & ran - badly. I switched it off & felt the exhausts, 1 & 4 were cold, 2 & 3 were warm - coil pack - it's a wasted spark system so 1 & 4 fire together as do 2 & 3. I unplugged the connector, plugged it in again, turned the key, pushed the starter - perfect idle.

One last job, make up a bracket to stop a couple of HT leads getting wrapped around the throttle linkage & that was it for the day - sort of.

As I have all three cars mobile I've swapped the kits round & took some photos of the Stylus with the DRLs on & off. Tomorrow I'll spend a little time on the Quantum.


DRLs - now you see them.


Now you don't.

Tuesday 17 August 2021

Almost Finished...

 ... Well - allow me to qualify that. The Stylus is NOT nearly finished, however the tasks I set myself to have it ready in case I needed to take it on the road trip to Wales are nearly finished.

The dashboard is just waiting for the primary clocks - the speedo & rev-counter. The "Spitfire starter button" as they are invariably described on Ebay, is in & working, To be fair it is a Spitfire starter button, but it's just an Air Ministry standard part, so while it was used as a starter button on a Spitfire, the same would've been true of the Hurricane, Lancaster, Tiger-Moth & indeed anything else that needed a momentary switch.


As the dash neared completeness I looked at the shift lights. When I got the car there were two of them on "trailing leads", I only wanted one & I wanted it screwed down. Putting it on a battery I found there are two arrays in each, a greenish yellow one & a red one, but couldn't find how they were wired until I realised that the ECU drives one set & the rev-counter drives the other, so the two arrays are sequential.

Having sorted that out it was a simple matter to draw up a dash top pod to mount the light in & print it. Sounds simple, but you're looking at the thick end of a day's work there.

Simpler & easier was a charger point, as the car has the same type of small battery the Fury had, I've fitted a charge point for the Ctek battery keeper to the driver's side footwell where it's both out of the way & convenient at the same time. 


I've also decided to keep the Air/Fuel Ratio gauge for the time being, the previous owner mentioned a couple of times that the ECU could do with re-mapping, so the AFR meter will give me a good idea how urgent it is, but I didn't want it on the dash, so I drew up & 3D printed a pod that attaches to the dash mounting screws to hold it for now.

Also on the Stylus' job card today was a pair of Daytime Running Lights, they arrived from China a day or two ago & are the type I used on the Fury & the Quantum, they are just very bright LEDs in a small aluminium fitting with a thread on the back. I made up a couple of brackets, painted them matt black & mounted them in the radiator intake - where they vanished. That's what I wanted, ignition on & they are VERY difficult to ignore, ignition off & they're almost impossible to see. No photos yet as they're not wired up.

Finally for the Stylus, I added a little bling - again when I got the car, there was a "thing" in the centre of the steering wheel. The thing turned out to be a large wiring grommet - which was fine, but this bit of drawing & 3D printing looks better.


On the Quantum side of the equation, there was a club run to Cheddar on Sunday which saw the car no only keep up easily, but also achieve 38mpg on the blatt & over 40 on the way home. However I was getting concerned about the 3D printed throttle body adapter plate. It was working just fine, but looked a little "Salvador Dali", so having said at the time that the adaptor could ONLY be made by 3D printing, yesterday I made one in the garage from aluminium sheets - I'm that good. It's been tested & works, the only thing is I can't find my roll of gasket paper, so one of the interfaces is a cereal packet, but it's only cold air, so it's fine for now.

Here's a picture of the cars in the car park.

Friday 13 August 2021

A Near Conflagration

 Over the past few weeks I've been re-working & testing the wiring. A few times I've noticed that when the fuel system came on with ignition (High Pressure pump only - the Low Pressure one is switched off) there was a faint smell of petrol. Only very faint & almost instantly dispelled. A couple of times I'd felt around for wetness & found none, so I'd filed it under "I'll find out what that is one day".

Today was that day.

I decided that with all the bits fitted I was in a position to do a full system test & indeed start the engine. I switched the switch that would allow the LP pump to run, turned on the ignition & pushed the starter. The engine fired almost straight away & settled to a burble with the satisfying, near motorcycle revviness of a lightweight flywheel, the gauges swung to expected readings with excellent oil pressure, but next to no fuel. I was looking generally around to see if things I'd hoped for were indeed happening when I noticed a splash of liquid hit the air filter - then another. Standing up I could see it gushing from under the wing. It could only be petrol. With no ignition lock I had to find the screwdriver & turn the switch off, the engine died, I got out of the car to find a spreading pool of petrol a yard across.

"Eek" I thought (OK, what I actually thought isn't reproducible in a tome of this quality).

I found some rags & threw them in the pool, pushed the car back away from it (yes, yes I should've just evacuated), then took the sodden rags outside & allowed the remaining damp patch to soak in / evaporate.

All was well

(sigh)

The problem turned out to be a hose from the swirl pot back to the tank. It was detached so when the LP pump came on the tank filled & overflowed. Easy fix, but that explains the faint fuel smell when the HP pump was cycling petrol through the fuel rail back to the swirl pot.


In other news I've printed a centre for the steering wheel.


Thursday 12 August 2021

Almost Finished Wiring


There's just one more wire to tidy & shorten & one more to connect up & the mammoth dash replacement is done. Done enough to drive anyway. I'm waiting for ETB to send the new 80mm clocks, but Ive used the plugs & wiring from the 100mm ones & cut the holes already, so it should be a quick job when they arrive. I also need an ignition switch as the Escort one was deep under the dash & weighed 3/4kg.

When everything's done I'll trim it & a lot of the rest of the car with cream vinyl because I liked how that looked in the Fury.

Not the best of pictures, but you can see the warning lights work & the gauge lighting is on, what you can't hear is the demist fan & the indicator beeper working. I always fit a beeper as with the roof off the flasher unit can't be heard & the warning lights don't show up too well in bright sun - but - I also always fit a switch in the beeper earth because if I ever had to sit at the side of a road withe the hazards on I'd be a gibbering wreck by the time the recovery man arrived.

Also on are the new stalk switches, they were an essential as the old ones weren't working properly, but in the fullness of time I may well modify them to look a bit less "Escort"

Here's a heap of most of the wiring I've removed.

Tuesday 10 August 2021

Many Things

 I was pretty down first thing, then an e-mail from the solicitor stating that there could be thousands & thousands to pay in order to transfer pensions to my wife's name (to add insult to Ian Drury) got me worrying. I called all three pensions she'll get & none of them want money to transfer it, so that was a relief. After that my mood slowly improved & I trimmed & glued the screen vent plenums onto the dash top (deciding not to use the vents I'd bought), then I adjusted the Quantum's suspension & did some other tiddivating in case the guy that called me buys it.

Back on the Stylus I fitted the dash top & ran the hoses - the air side of the system is now complete from intake (not attached yet) to screen, so I wired it up & then also wired in the "Spitfire" starter button (it is, but it's just a standard part used on loads of aircraft & probably all sorts of other stuff too) & the de-mist & rear fog switches (Sea Harrier parts - guaranteed) & the warning lights. I'm still waiting on the ignition switch & the two primary clocks, but the dash is almost finished, so the car is almost driveable. If it goes to Wales in place of the Quantum it'll go with loads of trimming still to do & probably without a passenger seat. There's still lots still to do, but the list is getting shorter by the day.

Monday 9 August 2021

Really REALLY Bored With Wiring

 To be fair I have almost finished.

The dash will be removable - the clock fascias will be removable from the dash. The wires for the clocks & warning lights will go into a connector, out the other side & straight to their destination. This appears to be radical thinking on my part.

What the wire will no longer do is come out of the car loom, into a connector, out the other side onto the dash loom, into another connector & back into the car loom. All the wires on the dash side of a connector will go to things on the dash - they will NOT go to things on the car thus preventing the dash from being removed. Wires going to a connector will NOT pass both sides of wires in other looms so locking the whole thing into a birds nest of epic proportions.

Whether the car ever works again is another matter of course.

NSRA Supernats

 The National Street Rod Association's Super Nationals show didn't happen last year, but it was back in a slightly smaller format last weekend, so I was up with the lark & off to my brother's to cadge a lift in his model A pick-up to Old Warden Aerodrome - home of the Shuttleworth collection of 100 year old flyable aircraft. On site we met Linda from the car club who was not a HotRod aficionado, but is a proper petrolhead & regular visitor to the hangers at Old Warden.

So What did we see?


Many Pops in more colours & styles than you could shake a stick at, Resto rods, street rods, gassers street legal drag cars, vans & four doors (OK so officially that's a Prefect, but some of the Pops were Anglias & the vans were Fordsons) in every conceivable permutation.


Close by we found the welcome return to the show scene of Andromeda, a "Fad T" built in the late '70s by Nick Butler when everyone else was jacking up Cortinas, this car was on another level altogether. In the 90s a deer-strike near Dorking left it very badly damaged, but a couple of owners & a huge amount of hard work later & it's back.

We wandered around a fair bit so must have seen just about all the cars, below are some I thought to take pictures of:-


If you've got a custom truck, what you really need is a belly tank racer to set it off.

The belly tank racers were just that - a war surplus drop tank fitted around a minimal chassis to run at Bonneville.


Detail, details ..... there were three PB Crestas all in a row, one saloon, one estate & this. Space frame chassis, tubbed read arches for the HUGE wheels, rear doors welded up, but door handles still in place for the look of the thing - and wheelie castors.


Thames 300e panel van "Gasser" if you're struggling for traction, raise the centre of gravity to get weight transfer onto the rear wheels. I always liked the gasser look.

Not good for corners though.


At the other end of the scale are the low-riders. No attempt at speed here, it's all about the look.


Or if you don't want to go up or down, how about short? Simple enough to do, not simple to do it this well.

Shorty Type 2s were a thing a few years back, this one survived.


That's a fibreglass shell under all that rust, it took a while to be sure though, some panels were flaking & de-laminating.


Cute - but not slow. This beautifully restored Fiat 500 "Toppolino" has a Fiat 2.0 twin cam detailed to match the burgundy & cream colour scheme. It was just stunning


Hard-as-nails 105e Anglia on a spaceframe  & big power V8 to match the looks


More 105e, more big power, but look at the body - the scallop has been taken out of the side, the wheel arches radiused, the badge rebate in the rear pillar dressed out, SO much work, but maybe Ford should've done it like that.


Jaaag with a difference, the stance, the wheels ...............


......... the 900bhp twin supercharged V8


Monday 2 August 2021

Axle & Upholstrin

 One disappointment in the Stylus when it first arrived was a leaking axle, just a weep from the offside bearing, yesterday I decided to deal with it. I'm generally a bit cynical about rear disc brake kits on kit cars, there's not really enough weight to make them work for a living & then they start seizing & so on.

But - when you need to pull the half shafts they are a godsend! Ten minutes from jacking the car up to half-shaft-in-the-hand. At first I thought the bearing had had it as there was a slight movement, but I now think they're fine, a quick google found a forum with a couple of people describing a weep after an axle rebuild & many people suggesting the outside of the bearings had not been sealed. A quick rifle through the Haynes-book-of-lies found the page for half shaft replacement & sure enough there was no mention of sealant. There was evidence of the brick red sealer, but it was patchy & old, the LSD was only added a couple of years ago & the car's hardly moved since.

While I was under the back I noticed a single drip of oil under the near side & pulling that half shaft showed the same red stuff, but also black silicone - but again it didn't look new.

So, did whoever fitted the diff &/or brakes not apply any sealant? Replacing the bearings is going to cost >£100, so I've cleaned up all the surfaces & tried a little blue sealant to see if that fixes it. The axle was topped up & took about 150ml.

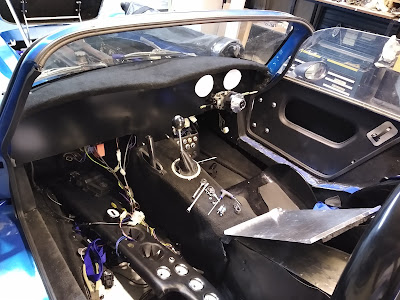
Apart from that bit of "proper" mechanical engineering, I've been working on the interior. I had already made a dummy dash from corrugated card, now I translated that to the dash blank from CBS. It's waffer theen aluminium bonded to a plastic core (I suspect it may be the stuff Grenfell Tower was clad with, which may explain why it's available for dashboards). The cutting went OK & the basic shape now fits. I'm still agonising over the speedo & tacho. I don't really want 100mm clocks (though I can make them fit), but what I REALLY don't want is a speedo that goes up to 180mph & a tacho that says "8 cylinder" on the face. In the case of the speedo, the scale is such the the difference between 30mph & 3 points on my licence is hard to spot - I would be perfectly happy with a speedo that goes up to 80. If I need any more I have the SatNav. So it looks like the Cobra clocks will be going on Ebay & I'll buy another Speedo & tacho in 80mm flavour (sigh).

Having cut out the dash, I needed brackets. It'll be held to the trans tunnel, each side wall & to the dash-top - which will be bolted in, not held on with velcro as it was. I made up the trans tunnel bracket & inevitably put some holes in it because that's what I do.

I wasn't brave enough to start cutting the holes for the minor clocks, so I moved onto the footwells.

When the car arrived the outboard side of the off-side footwell was covered(ish) in a ratty bit of carpet that had at one stage been glued on, but as now just held by the bolt through a P-clip retaining the bowden cable for the brake bias. 

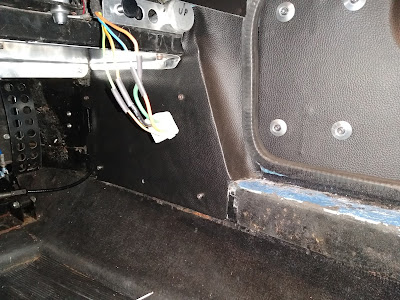
At some intermediate stage someone had re-attached it with duct tape which had gone crusty & fallen off, leaving the thing in a prime location to wrap itself round the driver's feet at some inconvenient point. I removed it & found the roughly made aluminium panel behind it was held on with yet more self-drilling roofing bolts. I drilled the holes out a bit, fitted riv-nuts & straightened the panel out, trimming edges & rounding corners. There was another aluminium panel just ahead of the door shut & I wondered for some time how to make it all blend together without too many edges. In the end I glued vinyl onto the flat panel but left a large flap, when the glue was glued I put more glue on the flap & on the second panel, bolted the flat panel in place, put the second panel in & carefully wrapped the vinyl onto the second panel & beyond so it's trapped by the door seal. It was a bit fraught as things using contact adhesive tend to be, but I'm pretty pleased with how it turned out. It's so good that I'm pretty sure that NO-ONE WILL EVER NOTICE IT - which is a good thing - sort of. It'd be nice if someone said "hey, those footwell panels look REALLY good" just once. By the way, the fasteners are temporary ones, black stainless flanged button-heads are in the post.

The near side footwell had no trim at all , just the ECU bolted to a 5mm plate which I'd taken out a while ago. With a new panel created to match the off side one I repeated the process & amazingly - that worked as well! This one needs a little re-work to add a port for the ECU connector. I expect I'll print something.

So the interior is coming together. The next step it so take a brave pill & cut the holes for the minor clocks, then disentangle the wiring on the old dash & set it up nicely on the new one. Same with the switches, cover it in vinyl & the car will be nearly ready for the road.