Friday 31 December 2021

Festive Period

There’s been a lot of garage action over the festive period, but not a lot worth photographing I’m afraid, here’s a sort of list:-

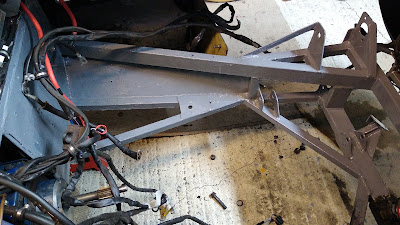
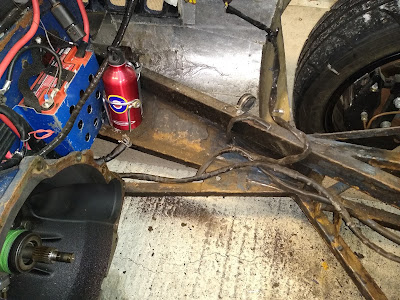
Chassis – all the cleaning, de-greasing & painting is done (bulkhead forward).

Fuel System – cleaned, re-configured, shelf re-engineered & re-installed.

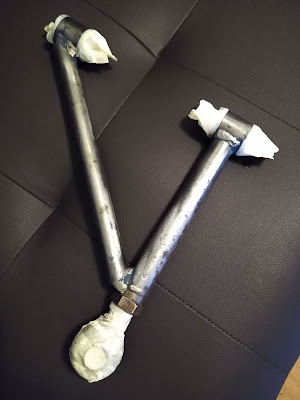
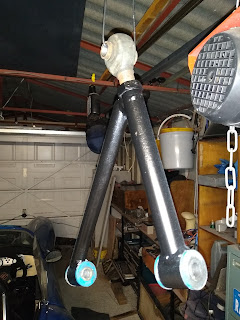
Front Suspension – cleaned, de-greased, painted & re-installed. I have a query in with the shock manufacturers as there’s no lock rings on the lower spring pans which doesn’t seem right.

Brakes – Cleaned ready for reinstallation, but with the smaller discs & the spacers under the callipers removed the pads overhang the discs by about 5mm so I need to get the mounting brackets machined, I have a plan for this!

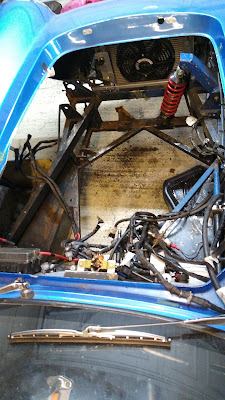
Brake lines – Re-installed, now with bolted P-clips, not riveted. Flexi lines replaced.

Electrical looms – Re-installed, now with bolted P-clips, not riveted. Battery & cage re-fitted.


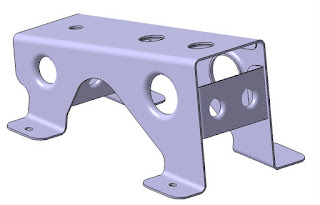
Brake reservoirs – The three reservoir pots (front brakes, rear brakes & clutch) & their bracket have gone, there will be a combined brake reservoir - crucially with a low level warning - & a separate clutch reservoir. I’ve drawn up the new bracket & a sheet of 1.5mm aluminium sheet is on its’ way. The final design may get "rationalised" (not be that posh).

Fuel lines – The two original ones remaining on the car are cracking & need to be replaced.


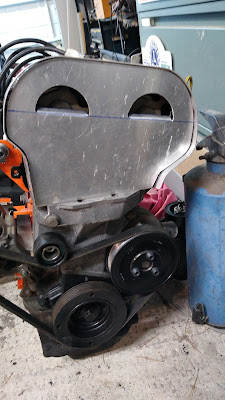
Throttle Bodies – The vacuum lines weren’t great so there’s new silicone hoses in the post. Also the trumpets / ram pipes / velocity stacks were parallel for most of their length with a flare at the end – which was just inside the air filter inner surface. I want to replace the air filter with an airbox & remote filter / intake, but for now I’ve drawn up shorter trumpets with a nice parabolic entry & the first pair is on the 3D printer as I type.

So the car is very much being re-built ready for the engine to go in when the aluminium bell housing arrives, hopefully mid January, there’s some fiddly bits like the brake calliper brackets & reservoir mount, but mostly it’s just putting stuff back & making sure it works.

Monday 20 December 2021

And - Breeeeeath

Half of the chassis refurb is kind of finished!

After what seemed like a week of scrapeing & cleaning - but was probably seven days, all the rust & paint was finally stripped & after de-grease & metal prep, a couple of coats of grey have been splashed across it. It doesn't look brilliant, but it was never going to, being a 20 year old chassis & looking good was never the point.

While that was drying I took a trip to Think Automotive & purchased a few fittings to get the fuel system sorted. It looks similar, but the tray has been lightened & stiffened, the hose & wiring runs are simpler, the filters are in the right places & it’s been de-blued.

I've added a fastner into the pedal box at the top because the whole tray was more or less attached in a single plane & although a stiffener had been rivetted on to support the swirl pot, it had been placed vertically so wasn't doing much, I've lowered the swirl pot & placed the stiffener horizontally & the swirl pot no longer sways about.

I just need to get the off side cleaned stripped & painted & I can start re-building! HURRAH!!

Saturday 18 December 2021

Scope Creep...

 ... Yeah, there's a bit of that going on.

Having decided to change the engine because I ran it air cooled for two hours (it still started & ran) it seemed sensible to bring forward the chassis refurb I'd planned for next winter, but then the front suspension would ideally need to come off for access, so why not clean & paint that at the same time?

Actually, if the front suspension's off, why not modify the brakes to allow the 13" wheels I'd like? Although as there's now air in the brake lines, I may as well swap from the three reservoir set up (front & rear brakes & clutch) to a combined reservoir for the brakes that allows a low-level switch - reduced weight, added safety - win/win.

But while I'm messing with the hydraulics I could take out the piece of rigid pipe from the belhousing to the clutch slave cylinder - it does nothing & is just more weight & potential leak paths.

OK the front of the car's looking pretty bare now, but there's a shelf under the off side wing with a fuel swirl pot, a pump & two filters on - it's in the way of chassis cleaning & really - I'd like to rationalise it a bit, but with all the components out of the way, I find it's held in by bolts - I'd assumed it was originally a welded in battery tray. So now I can take that  out & strengthen it as the swirl pot's always moved about.

The upshot of all this over-thinking is that there is now nothing else to remove forward of the front bulkhead & I have a LOAD of work to do. The near side front suspension is all cleaned & painted, I have new brake lines for the front too & I've established that I can use the calipers on the car with Capri 2.8 front discs to allow 13" wheels. The near side of the chassis is all stripped of paint, powder coat & in some places underseal, de-greased & ready for prep & paint with POR15. When that's done I'll re-fit the near side suspension & start on the off side, as well as cleaning & de-greasing the rest of the chassis. After that, I have to make something sensible of the fuel system parts & make a new hydraulic reservoir support bracket, Re-fit the brake lines, drop the new engine in & get it rolling-roaded.

It'll be like a new car - IT DAMN WELL SHOULD BE!! The only things I won't have touched will be the rear suspension, axle & brakes & they are all more or less new.

Wednesday 15 December 2021

Front Suspension


I've not been out to the garage for a day or two, I've been sorting some paperwork & dealing with the everyday stuff that gets in the way of hobbies. Today I put up new curtains in the Front room & in the Dining room, I took down a thin curtain pole that had a "string curtain" fly screen, put up a new curtain pole for - curtains, then re-bent the brackets for the thin pole & attached them to the brackets for the new curtain pole, so I have curtains for the first time, but inside them I still have the fly screen for the summer - I am that cunning.

But you haven't come here to read about my DIY.

With the engine bay stripped of just about everything, my attention has turned to de-rusting & paint, first thing in the barrel was the near side lower wishbone, it came off the car easily enough & I set to with a rotary wire brush & eventually all - or at least enough - of the blue paint was off it, then a wash with POR15 de-greaser, a dry off in the oven......... 
........ & it got etch primed & a coat of satin black. The rose joint & bushes seem fine, so it'll go back on once the paint on the chassis is finished.


The upright is stripped & cleaned ready for de-grease & paint, the brake calipers are off the car & cleaned ready to go back on with new hoses, but I need to visit Margnor to get a set of shorter bolts as they'll be going back on with Capri 2.8i discs, so won't need the spacers.


Last on the list for today was the near side rocker, I was very pleased to find it has the roller bearing set already fitted, so it's just got dismantled, cleaned, the paint removed & it'll get painted next time I'm in the garage.

Thursday 9 December 2021

Tin Bashing


OK, yesterday I said the cam belt cover was another ½ day’s work & today I’ve been on it pretty much all day BUT it is about finished & I’m quite pleased with it. I’m sure it would make my younger aircraft-fitter self weep & the riveting wouldn’t pass muster, but in my defence I didn’t really have any proper tooling, so it’s not bad. I was quite pleased with the Zed brackets that both hold the cover onto the engine and hold the front panel onto the side / top / other side.

Here you see it before final assembly held together with jig pins.  


The other thing is, it’s supposed to look old (it will look older when the brushed finish dulls down a bit) so when I found some aluminium sheet the right size with a few dents & scores in it I thought “that’ll do”, but now of course it looks like I dented it while making it – not so good.

I’ve also put a coat of orange on the cam wheels so they show up in the holes & painted over the remains of the red on the cam box with orange – not sure about that yet, I’ll see how it looks tomorrow.

There is also a question mark over whether it'll fit under the bonnet - it should do, but I'll cross that bridge when I come to it,


Wednesday 8 December 2021

Didn't Mention....

 A blatt in the Quantum last weekend. No supercars this time which is a blessing & the Q was very nearly faultless. The starter's still not right, but a new one will fix it when I have some money & for now I know the problem is heat & it's only going to get colder. But yes, it kept up wit the Elises, then took me to my Dad's, a friend's, my brother's & then home. 220 miles at 43mpg.

Pretty good for a 20 year old kit car.

Happy Engine

 In theory today’s job should’ve been more chassis cleaning, but as we discovered yesterday, I’m easily distracted from such things & indeed that was the case today.

First there was finishing stripping the engine mounts & putting them through the parts washer, then I took the silver top off the Silvertop (the cam cover) & swapped it for the black top from the Blacktop. Having started on the engine I carried on, fitting the coil pack mounting (one of the holes I’d used is the ONLY one that’s in a different place between the engines). I also swapped the oil pressure senders over which require removing the new alternator mount to trim a corner off – which was a good thing because I noticed it didn’t quite sit down flat, so I put a couple of washers under it to fix that & drilled & wire-locked the bolts for good measure.


At odd times during all this activity I put some primer & then satin black on the engine mounts so they are now FINISHED. Though I realised the holes in the block I need to use to fit the mounts have never been used, so I had to slot a bolt & use it to clean out the threads.


Then I stood back & looked at the engine & the cam belt cover stood out as being the only bit of plastic left on the engine, so I started making an alloy one using a slightly improved design to the one I made for the Fury.


So where do I stand?

The engine is all but done, just waiting on the clutch plate, the sump gasket (both in the post), the cam belt cover needs ½ a day to finish it, then the Silvertop can go into long term storage, the Blacktop can go into a corner & I can raise the car on stands to carry on with the chassis & begin the suspension.


And there it is - the happy engine >>


Tuesday 7 December 2021

Cleaning

 Today the nasty jobs started. To begin with I tried to put it off by dismantling & cleaning the engine mountings, but they wouldn’t dismantle. I could see the nut holding the rubber mount on inside the steel tube, but it wouldn’t undo. I couldn’t even get a socket on the nut properly. There was a fair bit of rust & crud in there, so I tipped in some WD40 & left it for later.

That left me with only one choice, I’d have to start cleaning the chassis – unless – really I should take out the exhaust manifold because that would just be in the way. The bolt head on the Mikalor clamp was mangled, so I cut through it, unscrewed the Lambda & it came out pretty easily. So now I really ought to clean the chassis – but the battery tray should come off - & then as it was covered in flaky blue paint (everything in the engine bay is covered in flaky blue paint), I took it off the car & wire-brushed it back to the alloy, then sort of polished the wire brush marks out.

So, back to the chassis – although – the WD40 on the engine mounts should’ve worked by now. It hadn’t, I tried a number of different size sockets & none would engage with the hex, there seemed to be a lump of stuff at the bottom of the tube stopping the socket going over the nut. I tried chiseling at it with an old screwdriver, but eventually got bored & went back to the chassis cleaning – which wasn’t actually too bad. There’s no pitting & although the inevitable blue paint & black powdercoat underneath have cracked & allowed water in, it’s just a little surface rust, so I’ve cleaned a fair bit of the near side & when the engine is ready to go in......

- so I can move the old engine into storage

- so I can decide where in the garage to put the car up as high as I can get it on stands

- so I can take off the front suspension & steering for access

– then it won’t be too bad a job to clean off the rest & get the surface prep & paint on.

When I’d finished, I looked again at the engine mounts & realised the lump of stuff stopping me getting a socket on the nut was weld – all I had to do was unscrew the rubber mount from the steel tube (sigh). I did clean them all up & cut off an old throttle cable fitting made from a piece of steel 1” x 1” x 2” – a solid block of steel welded on to the off side engine mount. Another bit of weight saved.


Friday 3 December 2021

Here We Go Again


Today saw the beginning of the next project. The Silvertop Zetec that ran air-cooled for a couple of hours has come out of the Stylus & I've started transferring the worth having parts onto the Blacktop. First to move was the Raceline flywheel - must remember to put a bearing in the end of the crank! It had a paddle clutch which only has 1mm of pad left, so I think I'll put a conventional clutch back in.

There's no rush, while it's out I'll be cleaning the oil off the chassis, then the peeling powder coat & paint, treating the surface rust & re-treating with all the tools in the POR15 box, the cleaner, the metal prep (which I suspect is little more than salt water, though I'll not be tasting it to find out), then the POR15 paint, probably followed by Hammerite or somesuch. After that the chassis should be good until all the petrol runs out.

Still to get swapped are the Raceline sump & the die-cast cam cover, the coil pack mounting plate & one or two bits that will go on once it's installed. One thing NOT going on is the alternator mount. Partly because the alternator will be on the other side of the engine, partly because it's made from 10mm steel plate & weighs 3 1/4kg. It is HUGE, but I'm guessing from the way there's a plate that wraps round the front of the engine, that it used to mount something else when the car was supercharged.


In other news, the Quantum now has a flexi-pipe in the exhaust, I had to move the LAMBDA boss into the Y pipe under the engine - don't know why I didn't put it there in the first place - & it now drives very well indeed. I just need to sort out the starter motor & it's all done - kind of. There's "nice-to-haves" like the stereo still to fit, but I don't use it anyway, I'll only be fitting it to fill the hole in the dash. But it's a world away from when I bought the car & it wouldn't go into gear because the clutch pedal hit the floor before it disengaged, if you could get it to disengage the gear shift was so sloppy there was no telling what gear you'd get, there was next to no power & these were good things because if it did get going the steering was too stiff to steer with & the handbrake didn't work. As well as some more minor faults. It now keeps up with the Elises on a Sunday run, so I'm quite pleased.

Friday 26 November 2021

Latest

There's not a huge amount going on in the garage at the moment, I have to keep all the cars mobile as I'll be servicing my daughter's car over the weekend, after that I can get serious on the Stylus.


But this week I thought about the SatNav Mount on the Stylus. There isn't a lot of space for it. The screen is quite small, so I didn't really want it on a suction mount. I drew up & printed a mounting that used a RAM mount & although my bit worked, the rest of the RAM mount was quite cumbersome on the Stylus' dash, so I looked at alternatives & wondered if I could print something that would clamp the RAM mount ball. I drew up the top half & printed it & if felt promising.

Sitting in the car I wondered how I could mount it & then realised I'd printed a plinth to raise the rear view mirror, could I integrate the SatNav mount with that? A little more CAD work & 4 hours printing & I have a mount which is secure & places the SatNav just where I want it, above the minor clocks, but below the mirror. I've not decided if it's a bit garish, I've run out of black filament so I might re-print it later.

I also recieved an e-mail this week from the nice people at EBC Brakes saying they had "Black Friday" deals on. Being a naturally cynical engineer, I raised my eyes to the heavens - but no! I looked up the XR2 brakes I needed for the Quantum & there were the vented discs & green stuff pads for £90 delivered, and the credit card bill had just closed, so I wouldn't be paying for them until the new year!

They arrived the following day - the doorbell rang & I walked round the house to see a large bear of a man with the brake box standing against the front door. "Thanks" I said, he sighed & said "the front door has to be open for the photo sir - so they know it's been delivered" It seems just handing it to the person it's addressed to is no longer sufficient! I went back round the house, through the house & opened the front door.


But they were all there in the box, & fitted beautifully, though looking at the old pads I was doing it not a mile too soon. >> That's a new green pad next to the old one that came off. I wondered if this is the first time the pads & discs had been changed since the car was built


Sunday 21 November 2021

Big Day Out

Up before the lark again & off out to meet up with some blatting folk near Horsham. The plan was to head out towards Winchester, turn back to LA (Littlehampton) & get breakfast. I had a further plan to go from there to Tangmere to walk round the museum, then go on to my cousins house for lunch with the family.

This weeks run proved to be a little different, they've been something of a Lotusfest since the writer of routes (blessed be his name) started driving a Lotus, but word had spread & today's gathering included a Ferrari California, two Maclarens & a Porsche GT3RS as well as a number of Loti, a Caterham & - erm - the Quantum, with a value less than the cost of servicing several of the other cars. It looked like the start of the Cannonball Run.

When it was time to go several of the newcomers were arguing about the route, not believing it could be three hours & planning on cutting it short. I followed the organiser & a group of about six trundled west with the rising sun behind us. All went well, the steering was nice & light after I moved the tyres round, the gearchange was better & the car is more than quick enough to keep up, until when pulling out of a side turning the exhaust separated from the manifold again.

I pulled into a car park, put two wheels on the kerb & went underneath, but wasn't able to get the pipes to align, so I reset the SatNav & headed due south for breakfast - very noisily. But on the upside the sun was out & it was a pleasant drive with the roof down.

When I arrived there was just a Maclaren & the Ferrari in the car park, so I parked up next to them thinking how embarrassing it was going to be & was shown to the table where the owners were sitting. Is seems the bulk of the supercar crew had almost driven straight to LA & arrived at 8:00am to find the cafe didn't open until 9:00 & had driven off. The two still there had found a coffee & waited. I explained the circumstances of my early arrival & then we to my complete surprise spent ten minutes talking about the Quantum, the Fury & the Stylus! Both of the chaps had owned Caterhams & one had done a lot of research & knew a lot about kits.

After breakfast I rumbled over to Tangmere where there were an unfortunate amount of tin-tops parked in front of the Harriers, but I managed a photo of the Q with them - sort of. Neither was an aircraft I'd had anything to do with (I mostly worked on Harrier IIs), the GR being far too old (its the actual aircraft that won the London to New York air race in the 60s), the Sea Harrier could've been one I worked on but it didn't give a date for first build, only conversion to FA2 standard,

I walked round the small but information packed museum for a couple of hours. They have some significant planes there - the Meteor that took the absolute speed record to 606mph & the Prototype Hunter that when modified a little took it to 727mph. Having been apprenticed at the Hawker factory in Kingston-Upon-Thames, I was interested in the workmanship & took a photo of the riveting on the nose of each aircraft:-


The Meteor has "flush rivets" in the nose area & highly polished gloss paint.


The Hunter has a finish I'd be happy with on my car - there are just as many rivets there, but most are invisible. Have they been filled & smoothed for the speed record attempt? Well if they had been The Meteor would've had the same treatment & the other Hunter in the shed next door was very nearly as smooth. Its just Hawkers - we were damn good! (I say "we", I was never that good myself, that's why I went to design.

Tuesday 16 November 2021

Back On The Ground

I may have found the cause of the handbrakes problem, on having it all in bits there was a scrape mark on the inside face of one shoe made by the lever that the handbrake cable pulls on. a swift tap with a hmmer had it passing the shoe as it should & having re-assembled it, the brkes come on more or less evenly - still not very well, but even at least. Having done that I fitted the new exhaust bracket, swapped the back wheels to the front & adjusted the side windows so they roll up & down nicer - the passenger side rear guide chanel was held in place with a block of expanded polystyrene. It's now done properly. With the car back on its wheels I did the merry dance that is swapping the car round & the Q is back on the drive awaiting a visit to the tyre shop to pick up two new Uniroyal Rain Experts & get the tracking checked.

I then spent another hour in the gagarge faffing with the Stylus, trying to get the best arrangement for strapping the hood down. After a number of ideas its now strapped between the roll bar & the rear bulkhead & it seems to work quite well,

Nothing exciting came in the post today


Monday 15 November 2021

Up In The Air


The cars have been swapped over & the Quantum is now in the garage, a foot in the air on axle stands. Yesterday I started looking into raising the exhaust. I'd made a bracket to support the pipe about 1/2 way along when I fitted the Zetec, but it still just caught the drive when I left the house, then of course there was the incident with the speed hump in the hotel in Wales when the exhaust got knocked off.

The old bracket was just a sheet metal angle, the new one is a much more substantial item that will raise the pipe by about 10mm - not much, but it doesn't need much. It's made from one of the legs of my old desk at work - they did throw it out before I "acquired" it.

It features my usual standard of welding & has had a coat of hamerite ready to go on the car tomorrow.

Next I straightened the steering wheel by adjusting the track rod ends, both kits have the wheel offset by about 5deg to the left - the Stylus being worse as someone fitted a "motorsport" D shaped wheel with a yellow band at 12 o'clock - which wasn't quite a 12 o'clock. So hopefully both wheels are now straight - or straighter.

I may have fixed the Quantum's gearchange! Up until now it's been pretty horrible, with no "feel", I had been told that it was because I had a late model gear shift, but an early gearbox, but I have found nothing on the internet to back this up - and you can usually find something to back up ANY theory on the internet. I added a small spring to the linkage I remembered my Mum's Fiesta had one, but the Quantum didn't - it's not stiff enough, but it's a start, but that made things worse because third - like a good heart - was hard to find. It occurred to me that the spring was pulling the lever to one side of the travel, but maybe that wasn't lined up properly with the selector in the gearbox, tweaking that has made all the gears easier to hit, BUT as mentioned, the car is a foot in the air. It may be a different thing when driving it.

Then it was onto the Q's handbrake - which is pants! It's been commented upon as being ahem - marginal at both MoTs I've taken it to & I had assumed the inner cable was kinked as it had not been well installed by the previous owner (one Colin Chapman - no, not that one). but initial investigation made me think that wasn't the case. One wheel works OK, I was able to tighten & undo the wheel nuts on the offside with just the handbrake resisting the torque, not so on the nearside. Tomorrow I'll take both drums off & see if I can see what the difference is.

So maybe, when it comes down off the stands it'll drive like a proper car! Or at least a proper car with really heavy steering.


Wednesday 10 November 2021

Odd Jobs

Been a bit of a strange day.

I started by fitting a tee in a hose so I can fill the cooling system - except that I can't because I'm still waiting for an adaptor so I can fit the fan switch to the water rail & a second fan switch for the radiator. But my main plan for the day was to find the cause of a couple of faults that popped up yesterday when I switched the ignition on. Firstly the green shift light came on, then I noticed the oil pressure gauge was right at the top of the scale.

I assumed the gauge was a wiring fault created by me when trying to wire up the brake microswitch - I tested the wiring & it all rang through, so I looked at the gauge. Putting 12v on the ign terminal & earthing the earth made the needle climb, so I e-mailed ETB Instruments who answered within the hour saying the gauge was fine, run these three tests to find the fault - excellent customer service! I ran the tests & it was a wiring problem, but not in the way I'd thought. I'd cut into the wire sheathing, found the black wire & linked to it - only to find afterwards that there were three black wires hiding in the sheathing & I'd found the wrong one. I connected to the right one & re-insulated the wire, but it now seems I'd blown the oil pressure sender. I've ordered another one.

The other fault was also of my own making (sort of) when putting the dash back in last time I must've caught a wire & pulled it out of the termination (not one I'd crimped I might add). The wire provided an earth for the ECU, so the shift light was on because that was the only way the power could earth. Crimp on a new termination, plug the wire back in & all was well.

Then I started looking at cameras - the Fury had camera mounts all over it, the Stylus has less - but they're more "integrated" with back & forward facing cameras on the same bracket, plugged into the same socket. I may add more, The Fury had a mounting that stuck out of the side of the car when in use,which gave some very dramatic shots - but I did have to be vary careful not to drive it into stuff or trip over it when getting out.


I've also fitted a third mount in the radiator intake for the dramatic low shot.


During all this busyness I noticed the tube light above the bench flicker, so popped into Screwfix & bought an LED replacement & fitted it - and watched in horror while the old tube slid s-l-o-w-l-y down the bench - just out of reach & smashed into a million tiny tiny pieces on the floor (sigh).

After I'd tidied that up, I adjusted the steering to (hopefully) straighten the steering wheel - not only was in not quite straight - which is both irritating & very "kit car", but the wheel is inevitably a "motorsport" type with the yellow bit at 12 o'clock, so it's REALLY OBVIOUS when the wheel's not straight. Doing that little job meant the car could come off the axle stands it's been on for a month or so.

Slowly it progresses.

Sunday 7 November 2021

Squint

Up early this morning & out in the Quantum - there was a blatt on.

I'd been hesitant all week because I had a niggling cold that wasn't anything much, but equally, wasn't going away either. Even the night before I'd decided I probably wouldn't be going, but set the alarm anyway & as luck would have it, the following morning I felt OK - OK for someone who's just been woken at 05:45 anyway.

I arrived at the meet point from the north just as GB arrived from the south & we sat awaiting the arrival of two others - there would be three lotii & me. One arrived pretty much on time, but no sign of the other. GB's phone rang "we're here at the meet point - here - at the caravan sales place. Can you google it on your phone?" Ten minutes passed in spite of the Exige driver being in the same village, he'd failed to find us. GB's phone rang again & shortly afterwards the Exige arrived.

We set off, as I was still a little under the weather I kept the hood firmly on & stayed at the back. Immediately the Lotii shot out of sight, followed by me missing a left turn & having to turn around. I was thinking of heading back as the thought of 100 miles driving alone didn't appeal, but I persevered & much to my surprise I caught them up only about five miles later.

We toured the lanes of Sussex & Kent & after a while we parked up in a farm entrance. It looked like it could be a bit tight, so I abandoned the Q on the other side of the road. Sure enough there was a sparce but steady stream of cars & pick-ups turning in. When we were rested, I set off first & had gone some way when the Lotus' appeared in the mirror & I quickened the pace a little. I'm not sure if the gear selector is getting better, or if I'm just getting used to it, but there wasn't a single fluffed gearchange. After a pleasant drive we eventually parked up as Isfield Station for breakfast. Somehow GB was there first having lost us at a junction, but there was bad news for the Q. One of the headlamp flaps was dangling forlornly in the headlamp well (hence the title), the hinge pin had worked it's way out & the hinge halves had separated. I removed the linkage & stowed it in the car. After breakfast one of the Lotus owners approached me & said "what engine have you got in that - it goes really well", I may have left them behind once or twice (ahem).

On my return home I looked for something to replace the hinge pin & found a long split pin which was slightly too big - I mean REALLY slightly. I put it in the drill chuck & spun it in some wet & dry paper for a few minutes & it fitted, I greased it & tapped it in, there was just enough leg to tap that to hopefully stop it coming out again, so all's well with the Quantum again - well apart from all the things I want to fix when I get it in the garage - hopefully next week.

Saturday 30 October 2021

Brake Lights

 I was sitting in the car a while ago & I pushed the brake pedal - the brake lights seemed to take a long time to come on, so I tried again & realised that as the brake lights are switched by a hydraulic switch, they come on when the brakes are on, NOT when the pedal is pressed. In theory I could be braking gently & the lights wouldn't come on at all.

To improve this & give someone following me just that split second longer to react I bought a microswitch & today I've fitted it to the pedal.

The pedals are inevitably billet alloy jobs & heavier than they need to be (I'd say they are heavier than the plate steel ones the Fury had), but the good thing is that the actual foot pad bit unbolts so I was able to make up a small bracket & mount the microswitch to the top of the pedal, triggered by a bolt head in the footwell roof. Nothing can hit anything else & the pedal travel isn't restricted at all.

I kept thinking "the last thing I must do is fit all this to the car without photographing it for the blog" & sure enough, the last thing I did..........

So you'll have to make do with the couple of poor shots here. The first one shows the pedals - I really should make an alloy cover for the throttle pedal - in the second one you can just see the new bracket & the triggering bolt above it.

Next job is to wire them into the circuit just by the brake reservoirs, which has an added bonus that I can also wire in a disused brake hydraulic switch which was fitted in the rear brake line (so presumably took even longer to come on). After all this the brake lights will have double redundant switching. I wouldn't plan it that way, but since it's there I might as well make use of it.

Wednesday 27 October 2021

Yet More Stuff

 Just two deliveries today, some engine paint & the header tank for the cooling system.


The catalogues & websites never give enough information, the Merlin Motorsport site gave a height & diameter for the tank, but it turns out that was just the tank, not the mounting bracket or the length of the hose stubs or anything, so when I put it on the car, this happened.


There's no way a 19mm hose it going to make that corner, so what to do?

I wondered about swapping the positions of the fuse box & the tank, so the tank was outboard & missed the engine, but that would mean complex pipe runs & wires crossing hoses & buying another sheet of aluminium.

I wondered about shortening the stub & using a silicone hose elbow, but that always looks messy with hose joiners & jubilee clips & there was no guarantee it would work. In the end I bit the bullet & sawed up the brand new £80 tank. I cut the hose stub off, taking as much weld as I could with it, cleaned the weld off the outside & drilled a new hole in the side of the tank, drilling up the sizes & finishing off with a sanding drum in a dremel to make the hose stub a nice tap fit in the hole.

The mounting flange also needed messing with as it was too wide to fit between the bonnet catch & the fuse box - this was a good thing though because I used an offcut to make a plug to fill the now redundant hole in the front of the tank. My theory being that it's the same aluminium as the welded on bracket, so it should pose no problems welding it.

So that was today's project, tomorrow I'll drop it into the excellent Ashby Welding in Church Crookham who will weld up where I've marked & then it's just getting the hoses sorted.


In between all this re-work, I fitted an oil catch tank. The car came with a billet alloy tank supported on a very dubious bracket. Being machined from billet it was very thick & heavy & blue anodised, so I put it on the Quantum which could do with some weight ahead of the front wheels. For the Stylus I found an old aluminium bike bottle & a nice light alloy cage & made up quite a nice folded bracket to secure it to the chassis rail next to the exhaust, the breather pipe will go in the top & I'll have to remember to empty it from time to time. The wire wrapped round it is the yards of wire on the lambda sensor, I should shorten that really.

Tuesday 26 October 2021

More Stuff

The postman arrived with no fewer than FOUR parcels for me. There was:-

Mmmm - shiny

The reverse water pump.

A new screenwash hose as the one on the car was slightly too short to make a nice "run".

Two lengths of heater hose (8 & 10mm) to make the air bleed pipe the cooling system didn't have.

A brass hosetail to replace the radiator fan switch.


The re-plumbing of the cooling system continues apace! The water pump with a reverse impeller - beautifully made by IKEngineering) arrived very well packed the day after it was posted, I only called to order it on Saturday, so very pleased with the service & quality. That means the slightly under-driven pump has only three pulleys & an idler, so it all looks neat.

The hose means the previously blocked off air bleed in the radiator will now vent to the header tank which will allow a little more water into the radiator.

The hosetail as I said will replace an un-used fan switch in the water rail (it'll be wired up & re-located closer to the engine in a position where it's permanently submerged), the hosetail is now the highest point in the system (except for the header tank) & will ensure the system is entirely full of coolant by allowing air back to the tank (due tomorrow). None of these things is going to make a dramatic - or even noticeable difference, but they all build in a little more "resilience" to the system.

In other news, I've booked the hotel for next year's "RogueRunners" road trip, in Northumberland, so now I just need to write eight routes & build a car reliable enough to take.

Saturday 23 October 2021

Progress!

 After all last month's expenditure I decided I needed to spend nothing on the cars until the credit card bill closed for this month. That happened this morning & I've already spent the best part of £300 on the next batch of parts.

Today in the garage I cleaned the last of the oily muck off the engine ready for paint & with the arrival of some red heat shrink, I've finished the battery cut off switch. Not exciting or even particularly interesting, but it's another job done & means the car is mobile again.


Thursday 21 October 2021

Been Away

 Not much to report on the car front I'm afraid, I've been to Scotland in the Cactus - the THIRD time it's been there this year. This time I just set the cruise control for 55 & sat in the slow lane with the lorries. I find I don't have to concentrate full on & so don't get so tired, so don't need to stop as much. Also, the Cactus does an astonishing 100mpg at that speed on the flat! When I used to go to Scotland in the 80s it cost MORE in petrol than is does now in diesel & Petrol was £1 / gallon.

The point of going was to spend some time with my grandson & his family all of whom are lovely. My grandson is just at that stage where he's a bit unsteady on his feet, occasionally smelly & says one or two words at a time - he's 15 (no he not, he's twenty months).

On the car front I took the Quantum out on a club blatt & I have to admit it disgraced itself. Coming into a village the engine died, I was still moving so bump started it, then when clear of the village I pushed the clutch - it died again - & again. It was at this point I remembered the tool box was still in the Cactus, so I turned for home, keeping the revs up at each junction. When I got home, I eased off the throttle & the engine idled at about 400, I opened the bonnet & the Idle Speed Control Valve connector was dangling by its wires, I plugged it back in, the revs climbed to 800 & that was it fixed - I could've stopped & fixed it at any time (sigh).

Work on the Stylus continues only slowly, I'm not spending any money on the cars this month as I rather over did it last month, but I've taken the master switch off & moved it both electrically & geographically, so it's now tucked under a front wing & in the live wire rather than an earth. I've ordered a resistor for it, so it'll all work properly & also ordered some red heat shrink & re-used the earth wires it was connected to before.

The other thing that's happened is the passenger seat has gone off to an upholsterer of my nephew's acquaintance to have seat pads made. They'll be like the ones in the Fury that are easy to remove & easy to remove the foam from, so if they get wet they're easy to dry ready for the next day. Unlike the Fury they'll be curvy & diamond stitched to make the seat look a little more "late '60s" like the styling of the car. They're costing a lot of money so I'm hoping they turn out well. 

Saturday 9 October 2021

Re-Arranging

 With the media created fuel crisis still in full swing I still didn't wan to use the Cactus, so still couldn't swap the cars around or do anything serious to the Stylus, but there were things that could be achieved. One of these was to make space in the front bulkhead for a proper header tank to a/ get rid of the heavy stainless air separator attached to the chassis by only two bolts out of four, right at one end & b/ to give the cooling system some resilience in the form of an extra litre of water.


The fuse / relay box was mounted on the firewall to a very thin Carbon fibre panel which had been riveted glued on with most of a glue gun cartridge, I drilled the rivets & gingerly peeled it off revealing a number of holes of various sizes. After pulling the fuse box this way & that I decided where I wanted it & made up an aluminium panel that would fit & riveted it on with rubber edging all round the hole for the wiring (something it lacked before), so now I just need the credit card bill to arrive so I can order the new header tank.


I also started looking at the front indicators as the wiring inside the wheel arches looked wrong - too many wires - I took the headlights out & found this. The LED headlight units have built in LED indicators so there was a relay to turn off the side lights when the indicators were on, but the old LED indicators were still in the bowls as well as the original indicators still being in the bodywork below the headlights. 


I took out all the relay wiring so the built in indicators won't work, Then took out the Lucas indicators & replaced the metal gubbins with an aluminium disc with the formally hidden LED indicators in & now it all works & is simpler.

There were a few horrors, the power for the indicators had been taken by stripping the insulation from the feed wire, wrapping another wire round it by a couple of turns, then wrapping the whole in insulating tape. No solder, no connectors, in a wheelarch where it's all going to get wet.


^^This is the wiring that came out of just the headlight bowls.

Saturday 2 October 2021

Pulleys


The pulley issue is resolved!

I know I've been whittering on about the water pump & alternator pulleys for a while, so you'l be pleased to hear the whole issue is now sorted - & quite elegently too.

The Audi waterpump pulley arrived & the mounting holes lined up with the pump, but the big hole in the cente was too big. The mounting holes are 9mm for M6 bolts, so there was no chance of using the bolts to align the pulley co-axial with the pump - I needed an adaptor.

I drew this ring up on CAD with the idea that the outer diameter of the central "boss" would snap into the pulley, the inner diameter would fit over the central boss on the pump & the bolts would hold the whole thing together.


To check the sizes I printed one in "prototype pink" (when I ordered it it claimed to be red - it wasn't, so as I don't know any pre-pubescent girls who might insist on pink stuff I use it for prototypes). That fitted perfectly & I wondeed if I could just use a printed one, but sense prevailed - as the mounting bolts go through the part, when it got hot the platic would soften, the tension in the bolts would be lost & the pulley would first lose concentricity & then come off!


So yesterday afternoon in spite of the continueing media inspired fuel shortage, I took the Quantum over to my brother's house & re-made the part in steel - he did have some alloy, but it was an odd shape & would've taken ages to machine it down to something I could start from - all went well & this morning I just need to put the three mounting holes in & give it a coat of paint & I'm done.

The Audi part is a little larger than the Ford one, which means the pump will turn a little slower, which is OK as by internet reputation the Ford impellor cavitates at high RPM, it's also a little further forward, so it doesn't sit on the same plane as the Ford one, that's OK because all three pulleys have 6 grooves, but as the belt is only driving the water pump & the alternator I can use a five or even four groove belt & it can sit on the grooves that align - & as a bonus, because the Ford pulley is steel, the Audi one alloy, even with my steel adaptor, it's still lighter than the Ford one & the weight is concentrated closer to the centreline, so the engine will spin up an infitessimal bit faster.

Best of all, the whole thing has cost £15 & some time rather than the £110 for a billet alloy machined part from a motersport supplier.

Wednesday 29 September 2021

Many Things

 Well - a few things. Did I mention that the fuel "crisis" whipped up by the media has left me with a bit of a problem? The Cactus has about 600 miles worth of fuel in, so I'm leaving that on the drive because I'm going to Scotland next week, so I'm using the Quantum for general gadding about so I can't work on it. BUT that also means I can't start the real work on the Stylus either because that'll immobilise it (sigh).

So what to do? Well, a couple of weeks ago a roll of cream vinyl arrived so I've spent the last couple of days trimming the Stylus' insides. The first thing I had to do was take out the roll bar, the alloy panels under it & the seats. That done, I covered the parcel shelf & but the panels & the roll bar back. that in turn meant doing some wiring in the boot because one job always leads to two others. 

The back of the trans tunnel was next, followed by both door cills, then the awkward panel behind the door, I measured & cut two pieces only to find I'd cut them wrong! OH NO! Would there be enough vinyl to finish the job???

Yes there was.

Anyway having done them & the doors it looks quite good. It's by no means a proffessional job, but the carpet on the trans tunnel is pants & my efforts are a/ good enough for now & b/ better than the worn 20 year old flocking that was there before.

As well as all that, the door bell heralded TWO more car related items arriving. One was a cheque from the DVLA for the balance of the Stylus' road tax & the other was an Audi pulley.

The story goes ...... The blacktop Zetec has no fewer than seven pulleys on the auxilliary drive belt & by the time you dump the power steering pump, the antilock brake pump, the air conditioning pump & an idler there's three left. To the left is a picture of the belt it came with & the one it now needs. HOWEVER, the water pump is driven off the back of the belt so it turns the opposite way to the engine & it's pulley is smoooth. It's easy enough to buy an impellor which turns the other way so the pump can be driven off the ribbed side of the belt (other ribbed rubber goods are available), less easy to buy a ribbed pulley. Motorsport ones are easy enough to find, but are expensive & come in funky colours, so I did some research & by a roundabout route found a pulley from an Audi Q7 3.0 diesel. It's a little bigger than the Ford one & the cenre hole is a little larger, but the bolt pattern is correct & I can turn up an adaptor to cetralise it on the pump - £15 delivered.

Even better, one of the belts I already have fits! the upper side of the triangle touched the front casting of the engine, but a pulley from a cam belt kit bolted to an existing hole in the engine, diverts the belt & increases the contact area of the belt on the driven pulleys - Reeeeesult!.

Now, as if all that progress wasn't enough, I looked at the alternator  on it's bracket I made for £nothing & thought about an adguster. Years ago I was making a complicated clutch pulley system for the Fury & as part of that bought a track rod for a racing Kart. It didn't get used, but it's a hexagonal tube with a rod end screwed into each end - but where was it? Did I even bring it from the last house? Would the project stall even before it got started?

Yes I did bring it - it was in the second drawer I looked in.

I made up a bracket to pick up two inlet manifold mounting holes, cut the hex tube down & re-tapped the end, job done bar a little finishing tomorrow.

Saturday 25 September 2021

Mounting Tension

I have a bad feeling I've used that title before.

It's all a bit confusing at the moment. You would perhaps think that having three cars to call upon would make life easier, but no. Before I went off on this year's Rogue Runners Wales tour I filled the Cactus with diesel just because it was low. I filled the Stylus up before it's ill-fated first blatt & I filled the Quantum up when I returned from RRW21 for no better reason than I wanted to work out the mpg.

So no the media have created a fuel shortage out of nowhere I actually have plenty, but there's the rub. I'm going to Scotland to see family in a week & a half - I fully expect the whole storm-in-a-fuel-cap to be over by then, but in case it isn't I'll be leaving the Cactus on the drive as it has about 600 miles worth of diesel in it.

So I need to be using the Quantum.

So I can't move the Stylus out of the garage.

So I can't do the jobs that need doing on the Quantum.

But equally, I can't do the jobs that need doing on the Stylus because that would immobilise it & then I can't get the Quantum in the garage to do .......... etc.

However, I did pop over to my brother's today & make use of his pillar drill & lathe to make a mounting for the alternator for the engine that will go into the Stylus. It's a simple block of alloy that was used as a spacer under one of the many fuel filters. I've drilled a couple of mounting holes, put a threaded hole in one end & just because that hadn't put quite enough swarf on my brother's garage floor - added three lightening holes. I faced off the end on the lathe & it fits a treat, but the faced-off end needs trimming back by about 6mm - this was expected as I was never going to be able to get an accurate dimension while holding the block up against the engine with one hand, the alternator up against the block with the other, wrapping a belt round the pulleys with my teeth & having a steel rule taped to one knee. No. Better by far to make it fit the engine, the measure properly with it bolted up.

I even had a belt the right length!

I may take that idler pulley off, it just depends how close the the alloy front cover casting the belt comes.

I now need to make or find an adjuster bracket, but that's the easy bit.