Thursday 31 December 2015

Dash Refreshed

Well, I re-assembled the dash & fitted the new oil pressure gauge - of course it's not quite the same as the other gauges, but hey ho.

I fitted the new oil pressure sender & connected it up, started the engine & ........ odd, the oil light stayed on, but the gauge went off the upper end of the scale. Hmm, check earth, OK, take the dash back out of the car, check all the wiring, all OK, check the earths again, still OK. What was odd was that the oil warning light was on (no oil pressure) but the gauge was reading off the scale (lots of oil pressure).

Then (after a day or two) I realised I'd connected the light to the pressure sender & the sender wire to the low pressure switch. swap them over & it all works.

So now the dash looks like this:-
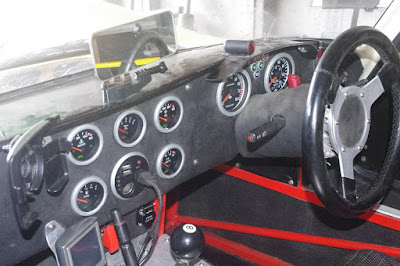
Out of sight on the right is a black anodised panel with the rear fog & screen heater switches, so it's all pretty neat (well, I think so).

Sunday 27 December 2015

Christmas Break

So what Have I been doing over the Christmas break then? Well I've hat the dash out & painted the rims of all the gauges & warning lights in aluminium, I've also made a new switch panel for the rear fog & screen heater switches & warning lights, as a bit of a dash refresh.

While the dash was out I replaced the bulbs in the gauges with LEDs & painted the bulb in the main beam with silver paint as it was too bright - the only thing I could see on main beam was the dazzle from the main beam warning light.

I also fitted the new oil pressure sender & wired up the gauge (Christmas presie) & started the engine. I’d always been worried about the oil pressure, the old gauge showed 1 – 3 bar & often flickered towards nothing-at-all, but the new gauge is showing a healthy 6 bar (90psi) at idle so all seems well.

So with that all installed I can re-fit the side pod & the dash itself - hoorah!

Sunday 13 December 2015

Cap Complete

With a couple of minutes to spare this morning, I finished off the 3d printed dummy oil filler cap with some silver paint & some lacquer
 <¬ Here we are, for something knocked up for free, I don't think it looks half bad, certainly more '50s than the one it covers up. I still need to glue it on.


This picture shows it with the ally cam cover & the retro stickerage.


Monday 7 December 2015

The Cap Fits

Did I mention the plan for a 3d printed oil filler cap cover? Did I? Did I?

It came out of the printer today, here it is, seen from the bottom, with the real cap for comparison.


And here's how they fit together.


I've started the paint to make it look more proper, first is filling the "engraved" text with red, then the circle will be painted black, then that'll be masked & the rest of it will be sprayed silver & lacquered


So at the moment it looks like this.

Sunday 6 December 2015

Instrument Of Doom

Some time ago the oil pressure gauge stopped working, I took the side pod off (the oil pressure sender is in the side pod) & found the spade terminal had come off, this wasn't good. I took the sender off the car & managed to solder a wire onto what was left, but it still didn't work.

I wasn't that bothered as the oil warning light triggers at 20psi & it was steadfastly off, but having a dead gauge is rather irritating. Now a year or two after I bought the gauge set for the Fury, the gauge maker changed a few things - including the oil pressure gauge. My sender was £15, the new one is £50, & doesn't work with the old gauges. What to do?

I looked at getting the mechanical Racetech gauge, but the face is completely different, but then I had a little luck & on the third page of a Google search was a Co. called "RallyNuts" who I think I've used before, they were offering the new Racetech gauge & sender £20 less than anyone else 7 since Christmas is coming, so is a new gauge & sender.

But to take a step back, while taking off the side pod, one of the bolts went Crunch - Splinter, never a good sound, the anchor nut had sheared it's rivets & was going round with the bolt - BUT fortunately I could reach the anchor nut through the battery bay door & managed (after some thinking & some swearing) to stop it turning with a bike spanner. I've just riveted it back on, but I need to put some copperslip in the anchor nuts to (hopefully) stop it happening again.

Tuesday 1 December 2015

Cap-In-Hand

One of the things happening to the car at the moment is "retroization" (yes, I did just invent that word). The red scallops, the alloy cam cover, the "Fury" script on the bonnet. But an idea occurred to me to further the cause. The alloy cam cover effect is slightly spoiled by the plastic filler cap. However I have now designed THIS!:-
The idea is that it will be printed (so will strictly speaking will still be plastic) & will clip over the existing cap after being painted silver red & black. It should look much more BDA than Zetec. There are precious few parts on the car that are purely cosmetic, but this will be one. I thing it'll look quite good.